

Cara Install Oracle 10G di Ubuntu 10.04
Langkah-Langkah :- Download Oracle 10g Database (10201_database_linux32.zip). Dapat di download disini
- Install Ubuntu 10.04
- Setup Ubuntu for Oracle 10g
- Backup sources.list:
# sudo cp /etc/apt/sources.list /etc/apt/sources.list_backup
- Run the following command and comment out the two lines:
# sudo gedit /etc/apt/sources.list
(Copy & Paste tulisan di bawah ini pada source.list)
deb http://kebo.vlsm.org/ubuntu lucid main restricted universe multiverse
deb http://kebo.vlsm.org/ubuntu lucid-updates main restricted universe multiverse
deb http://kebo.vlsm.org/ubuntu lucid-security main restricted universe multiverse
deb http://kebo.vlsm.org/ubuntu lucid-backports main restricted universe multiverse
deb http://kebo.vlsm.org/ubuntu lucid-proposed main restricted universe multiverse
- Run the following commands:
# sudo apt-get update (Update Linux anda)
(Setelah Selesai Update Ketik Tulisan dibawah ini pada terminal)
# sudo apt-get install gcc libaio1 lesstif2 lesstif2-dev make rpm libc6 libstdc++5
- Add new groups:
# sudo groupadd oinstall# sudo groupadd dba# sudo groupadd nobody
- Add a new user and change its password:
# sudo useradd -m oracle -g oinstall -G dba,admin -s /bin/bash# sudo passwd oracle
- Run the following command and add the lines that follow. Make sure there is a new line at the end:
# sudo gedit /etc/sysctl.conf
(Copy & Paste di baris paling bawah tulisan di bawah ini pada sysctl.conf)
kernel.shmall = 2097152
kernel.shmmax = 2147483648
kernel.shmmni = 4096
kernel.sem = 250 32000 100 128
fs.file-max = 65536
net.ipv4.ip_local_port_range = 1024 65000
- Refresh sysct.conf:
# sudo /sbin/sysctl -p
- Run the following command and add the lines that follow before the '# end of file' marker :
# sudo gedit /etc/security/limits.conf
(Copy & Paste di baris paling bawah tulisan di bawah ini pada limits.conf)
soft nproc 2047
hard nproc 16384
soft nofile 1024
hard nofile 65536
- Build links so Ubuntu looks like Red Hat:
# sudo ln -s /usr/bin/awk /bin/awk# sudo ln -s /usr/bin/rpm /bin/rpm# sudo ln -s /lib/libgcc_s.so.1 /lib/libgcc_s.so# sudo ln -s /usr/bin/basename /bin/basename
- Make an oracle directory:
# sudo mkdir /u01
- Let the oracle directory own the install:
# sudo chown -R oracle:oinstall /u01
- Change permissions of /u01:
# sudo chmod -R 775 /u01
- Run the following command and add the lines that follow 'unmask 022' (these commands setup the Oracle paths):
# sudo gedit /etc/profile
(Copy & Paste di baris paling bawah tulisan di bawah ini pada source.list)
export ORACLE_BASE=/u01/app/oracle
export ORACLE_HOME=/u01/app/oracle/product/10.2.0/db_1
export ORACLE_SID=orcl10
export PATH=$PATH:$ORACLE_HOME/bin
- Run the following command and add the line that follow (makes Oracle think its on Red Hat):
# sudo gedit /etc/redhat-release
(Copy & Paste tulisan di bawah ini pada redhat-release)
Red Hat Enterprise Linux AS release 3 (Taroon)
- after that do this command:
# cd /u01/
- Let the oracle user own the install file:
(Copy Hasil Download "10201_database_linux32.zip" pada folder u01)
# sudo cp "letak file anda" /u01/ (bisa langsung drag drop ke terminal)
Setelah Copy, Ketik Tulisan di Bawah ini Pada Terminal:
# sudo chown oracle:oinstall 10201_database_linux32.zip
- Change the permissions of kthe install file
# sudo chmod 775 10201_database_linux32.zip
- Move the file from your directory to the new oracle directory
# sudo mv 10201_database_linux32.zip /home/oracle# cd /home/oracle/# sudo unzip 10201_database_linux32.zip
- Logout User Anda, Lalu Login di User Oracle
- Selanjutnya buka terminal lalu ketik:
# cd /home/oracle/database/ (enter)# ./runInstaller -ignoreSysPreReqs
- Terakhir ikuti Langkah2 instalasi Berikut ini :


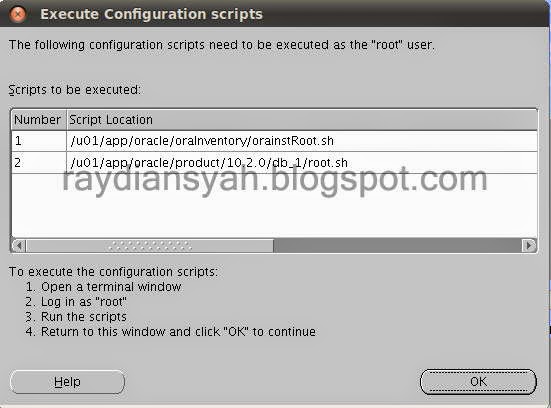
Setelah selesai install oraInsRoot.sh dan root.sh, masuk ke direktori foldernya seperti gambar di atas, setelah masuk ke direktorinya, langsung ketik di terminal, untuk
Pastikan dulu file orainsRoot.sh dan root.sh ada di dalam direktori anda, untuk mengeceknya ketik
# ls
setelah file ada di dalam direktori baru jalankan filenya :
orainsRoot.sh
# ./orainsRoot.sh
root.sh
# ./root.sh
Setelah selesai download install SQL Developernya dengan cara klik 2x, kemudian install package.
Cara Run :
- Via Browser : http://localhost:1158/em/console/logon/logon
- Via GUI : Applications-Programming-SqlDeveloper
Cara installnya masuk ke direktori file JDKnya kemudian ketik :
# ./ nama file jdk anda
Kemudian setting Path JDKnya :
- sudo gedit /opt/sqldeveloper/sqldeveloper/bin/sqldeveloper.conf
- rubah SetJavaHome ../../jdk menjadi SetJavaHome /home/oracle/Documents/jdk1.6.0_25/
- lalu save.
Setelah selesai, masuk terminal dan ketik
# sqldeveloper
setelah sukses, maka akan tampil seperti gambar dibawah ini


Terima Kasih.
Semoga Bermanfaat....!!!
Baca juga :
Solusi gagal connect ke database homepage oracle ubuntu
Membuat Koneksi Baru di Oracle 10G
Error Login Database Homepage Oracle 10G


0 comment: